Posts Tagged ‘Fusion Web Application’

As you might know Oracle ADF security is not included in ADF Essentials. For more information please refer to: http://www.oracle.com/technetwork/developer-tools/adf/overview/adfessentialsfaq-1837249.pdf

There are several solutions to secure your application for free. You may implement security totally by yourself in java code, you may use other security frameworks like Apache Shiro or use the Glassfish JAAS – based authentication. In this post I will explain the last option:

For more information about Glassfish JAAS based authentication check: http://docs.oracle.com/cd/E19879-01/821-0027/gepfq/index.html

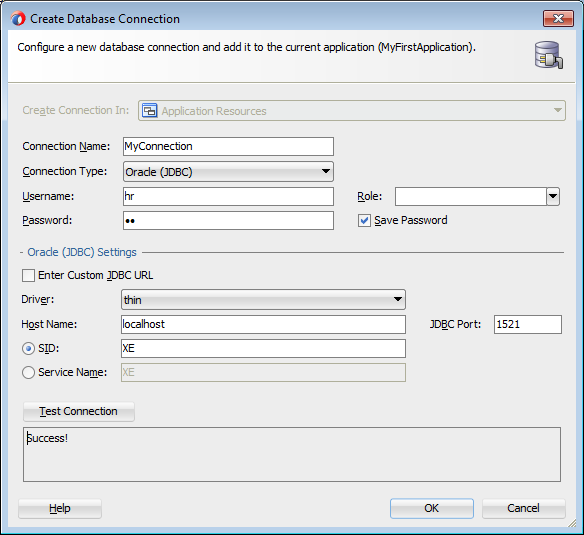
– In your database create a table (or view) that will contain the application users and roles.

– In your Glassfish go to Configurations > server-config > Realms and press New to create a new Realm

realm1


– Select Class Name from the drop down:
com.sun.enterprise.security.auth.realm.jdbc.JDBCRealm

– Fill the values as needed for your application

realm2

* You may insert the Digest Algorithm and Password Encryption Algorithm if the password of the users is stored encrypted. JAAS will make the encryption/decryption by itself without hard-coding anything.

– Back into your Fusion Web Application. Create two pages: login.jsf and error.jsf. In error.jsf just inform the user about the wrong credentials inserted. The code in login.jsf should be something like this:


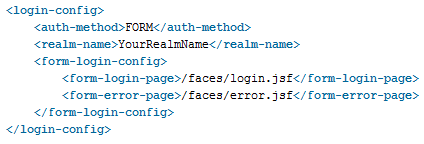
– Open your application web.xml file and insert the login configuration. The REALM name is the one you created in glassfish.

loginConfig


You have to create a security-constraint in your web.xml to define the web resources that should be accessed from a certain role. You may have many security-constraints within your web.xml.

loginConfig2


– Create a glassfish-web.xml file in your WEB-INF folder and define your application user roles there. This is a necessary step when deploying in glassfish.

glassfishXML


The configuration is now complete. Once you run your application in Glassfish, the login.jsf page will open automatically and access to the requested resource (page) will be allowed only if credentials are valid. If authentication fails you will be redirected at error.jsf.

– The username of the user that accesses the application through the JAAS authentication can be taken from FacesContext as below:


Principal principal = FacesContext.getCurrentInstance().getExternalContext().getUserPrincipal();
String username = principal.getName();


Detecting if there is an open transaction somewhere in the application is needed in a lot of cases. Below is the code I have used to detect a dirty transaction in my Fusion Web Application and ROLLBACK if dirty is true.

try {
FacesContext context = FacesContext.getCurrentInstance();
HttpServletRequest request = (HttpServletRequest)context.getExternalContext().getRequest();
BindingContext bctx = DCUtil.getBindingContext(request);
DCDataControl dc = bctx.findDataControl(“MyAppModuleDataControl”);
MyAppModuleImpl am = (MyAppModuleImpl )dc.getDataProvider();

if (am.getTransaction().isDirty()) {
am.getTransaction().rollback();
}
} catch (Exception e) {
e.printStackTrace();
}

This tutorial is a step-by-step on building a simple Fusion Web application with JDeveloper and ADF 12c. The steps are the same as for 11g. This tutorial doesn’t give detailed explanation of particular parts but just an overview.

  • Open JDeveloper 12c
  • File > New > Application > ADF Fusion Web Application

Image

  • Name your application and change the application directory if you wish

Image

  • Click ‘Next’ to pass through other steps and do not change nothing. Press ‘Finish’.
  • Your application should now have two projects: ‘Model’ and ‘ViewController’. Model will contain the application business logic and the ViewController will contain the JSF/JSP pages and the managed beans if needed.
  • Right click on your Model and go to: > New > From Gallery and here click on >ADF Business Components > Business Components From Tables

Image

  • In this moment this windows should show up

Image

  • Click on the green plus and fill the fields in the other window as shown below.
  • You may click on the ‘Test Connection’ button to test the values. (Database user/pass is same if you did not change it by yourself: hr/hr)

Image

  • Click OK in the both windows and this window should open now. Below on the left side are the tables that HR schema contains. Don’t worry if you see listed some other tables here, they are not related to this tutorial.
  • In this step we will chose which tables will be used as EntityObjects in our application. We will chose only Employees and pass it to the right just as below and click Next.

Image

  • In this step we can chose which EntityObjects will be used as ViewObjects in our application. We only have one EntityObject listed in the right, so pass it in the left as shown below and click ‘Next’.

Image

  •  In the next step, JDeveloper allows us to select which database tables we want to use as Query Based – ViewObjects. In this application we wont use any of those so just press ‘Next’ till the end without changing nothing and Finish.
  • Your application should look like this now:

Image

  • Now we will create the first JSF page of the application. Right click on ViewController and chose >New>Page and give a name to your page

Image

  • Now expand the DataControls pane and expand your AppModuleDataControl. There should be EmployeesView1 listed. Now you just have to drag & drop it on your JSF page.

Image

  • Chose ADF Form from the list and tick Row Navigation and Submit as shown here

Image

  • Now click OK and run your application. (Right click on your page and RUN)
  • Your application is now ready.

Image