Posts Tagged ‘jdeveloper’

JDev & ADF Goodies

A question on the JDeveloper & ADF OTN forum about removing rows from a table which is based on a list of POJOs provides the reason for this blog post. The implementation, as simple as it is, holds a surprise.

The sample application build for this sample shows the POJO and the list of POJOs built from it. The list is lazy initialized at the time it’s first accessed (see https://tompeez.wordpress.com/2014/10/18/lazy-initalizing-beans/ for more info on this technique). On the only page a table build from this list.

In the last column we add a button which should remove the row.

As the table is build on a list, we can’t use the default selection listener to get the selected row. Instead we use a setPropertyListener to pass the selected row index to a viewScope variable.

The actionListener we use for the remove button picks up the row index and users…

View original post 274 more words

JDev & ADF Goodies

I almost missed that Developer Cloud Service has been updated to 12.2.1. Great news as we now can use JDeveloper 12.2.1 to access the agile capabilities like

  • Interact with Tasks/Issues in JDeveloper
  • Leverage the Team view in JDeveloper (tasks, builds, and code repositories)
  • Connect to DevCS and its projects from inside JDeveloper
  • Create Agile boards and manage sprints in Developer Cloud Service
  • Associate code commits with specific tasks
  • Monitor team activity in the Team Dashboard
  • Handle Git transactions

For more information about how JDeveloper and the DCS are integrated watch this video ‘Agile development with Oracle JDeveloper and Oracle Developer Cloud Service’.

This was possible since last year. So, what’s new?

New is that the JCS is also available in 12.2.1 and that we can use the whole continuous integration scenario. For this we have to configure a 12.2.1 JCS instance which then can be used for deployment. When…

View original post 199 more words

Shay Shmeltzer's Oracle JDeveloper and ADF Blog

Picking up from yesterday’s post about using the External Tools->Ant Operation to integrate third party utilities into JDeveloper, here is a quick entry that shows how to integrate the FindBugs utility in a similar way. (You should probably watch the Checkstyle video first).

First get findBugs and extract it onto your hard drive (in my case I extracted it to C: to get the folder C:/findbugs-2.0.0.

Then in that directory I created the following ant build file:

<?xml version=”1.0″ encoding=”windows-1252″ ?>
<project xmlns=”antlib:org.apache.tools.ant” default=”init”>
<taskdef name=”findbugs” classname=”edu.umd.cs.findbugs.anttask.FindBugsTask”/>
<target name=”init”>
<tstamp/>
</target>
<property name=”findbugs.home” value=”C:/findbugs-2.0.0″ />
<target name=”findbugs”>
<findbugs home=”${findbugs.home}” output=”text”>
<sourcePath path=”${basedir2}/src/java” />
<class location=”${basedir2}/classes” />
</findbugs>
</target>
</project>

When you create the External Tools -> Ant operation you’ll point to that file and choose the findbugs operation. You then define basedir2 as a property of the Ant operation and uses the ${project.dir} value in JDeveloper. And you can…

View original post 78 more words

In ADF showing a popup comes easy using the Show Popup Behavior operation from ADF Faces. However sometimes it is handy to control the popup behavior through managed bean method. To achieve this:

1- Bind your popup to a managed bean property, lets say myPopup

2- In your managed bean method, apart from your application logic add these rows:

RichPopup.PopupHints hints = new RichPopup.PopupHints();
getMyPopup().show(hints);

3- To hide or close your popup:

RichPopup popup = getMyPopup();
popup.hide();

This post is about some tricks to the  <af:calendar> component. For a detailed guide and tutorial to <af:calendar> you may follow these links:

Working with ADF Faces Calendar Component – An Oracle JDeveloper How To Document 

ADF Calendar Summary – oracle.adf.view.rich.component.rich.data.RichCalendar

To change the colors of the events in <af:calendar> we should override the activityStyles. In your managed bean create a HashMap variable and override its get() method as shown below:

private HashMap activityStyles = new HashMap<Set<String>, InstanceStyles>();

public HashMap getActivityStyles() {
try {
HashSet event1 = new HashSet<String>();
HashSet event2= new HashSet<String>();
HashSet event3= new HashSet<String>();

event1.add(“Milestone”);
event2.add(“Obligation”);
event3.add(“Task”);

activityStyles.put(event1, CalendarActivityRamp.getActivityRamp( CalendarActivityRamp.RampKey.PLUM ));
activityStyles.put(event2, CalendarActivityRamp.getActivityRamp( CalendarActivityRamp.RampKey.ORANGE ));
activityStyles.put(event3, CalendarActivityRamp.getActivityRamp( CalendarActivityRamp.RampKey.MIDNIGHTBLUE ));

} catch (Exception e) {
e.printStackTrace();
}
return activityStyles;
}

In calendar property:

activityStyles


In calendar activity attributes you have to select in Tags the property of your view object, based on which the colors are meant to change.

tags


The other calendar activities in the above photo are not relevant, you may have other names for your attributes.

This tutorial is a step-by-step on building a simple Fusion Web application with JDeveloper and ADF 12c. The steps are the same as for 11g. This tutorial doesn’t give detailed explanation of particular parts but just an overview.

  • Open JDeveloper 12c
  • File > New > Application > ADF Fusion Web Application

Image

  • Name your application and change the application directory if you wish

Image

  • Click ‘Next’ to pass through other steps and do not change nothing. Press ‘Finish’.
  • Your application should now have two projects: ‘Model’ and ‘ViewController’. Model will contain the application business logic and the ViewController will contain the JSF/JSP pages and the managed beans if needed.
  • Right click on your Model and go to: > New > From Gallery and here click on >ADF Business Components > Business Components From Tables

Image

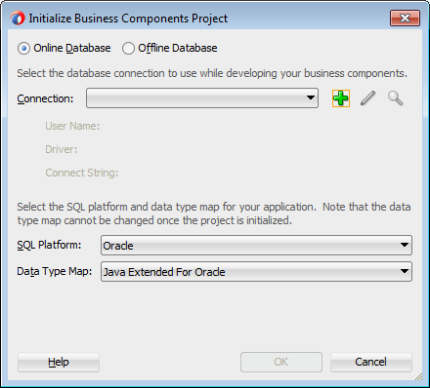
  • In this moment this windows should show up

Image

  • Click on the green plus and fill the fields in the other window as shown below.
  • You may click on the ‘Test Connection’ button to test the values. (Database user/pass is same if you did not change it by yourself: hr/hr)

Image

  • Click OK in the both windows and this window should open now. Below on the left side are the tables that HR schema contains. Don’t worry if you see listed some other tables here, they are not related to this tutorial.
  • In this step we will chose which tables will be used as EntityObjects in our application. We will chose only Employees and pass it to the right just as below and click Next.

Image

  • In this step we can chose which EntityObjects will be used as ViewObjects in our application. We only have one EntityObject listed in the right, so pass it in the left as shown below and click ‘Next’.

Image

  •  In the next step, JDeveloper allows us to select which database tables we want to use as Query Based – ViewObjects. In this application we wont use any of those so just press ‘Next’ till the end without changing nothing and Finish.
  • Your application should look like this now:

Image

  • Now we will create the first JSF page of the application. Right click on ViewController and chose >New>Page and give a name to your page

Image

  • Now expand the DataControls pane and expand your AppModuleDataControl. There should be EmployeesView1 listed. Now you just have to drag & drop it on your JSF page.

Image

  • Chose ADF Form from the list and tick Row Navigation and Submit as shown here

Image

  • Now click OK and run your application. (Right click on your page and RUN)
  • Your application is now ready.

Image